End to End Testing in ElasTest
Installing ElasTest pluging in Jenkins

We want ElasTest to be a non-intrusive tool in your day-to-day activities. Therefore, we have created a plugin for the most widespread open source CI server: Jenkins. Thanks to this plugin you will be able to make use of the functionalities provided by ElasTest from any Freestyle or Pipeline project effortlessly. You'll see ElasTest provides value since the very beginning. However, to unveil its full potential, some help from your side is needed. Don't worry, this tutorial and the following ones will guide you through getting the most out of your testing activities in a stepwise way.
To start trying ElasTest from Jenkins, you can choose one of these two options:
- Use the Jenkins server provided by ElasTest. ElasTest already provides a Jenkins server ready to use as part of the ElasTest platform. This means that it is not necessary to install a dedicated Jenkins server and the corrsponding ElasTest Jenkins plugin on top of it, you can start playing with Jenkins and ElasTest without hassle. The integrated Jenkis server can be started in two ways:
- Start Jenkins with ElasTest: just add the option [--jenkins|-jk] to the start command of ElasTest. See the link for further details.
- Start Jenkins from ElasTest GUI: Jenkins can also be started from the ElasTest GUI once ElasTest has been started (this is explained on the next page).
- Integrate your own Jenkins with ElasTest. If you alredy have a Jekins server up and running, you can install the ElasTest Jenkins plugin, available from the plugin management page. This proccess is described below.
Plugin installation
To install the ElasTest Jenkins plugin, follow this steps:
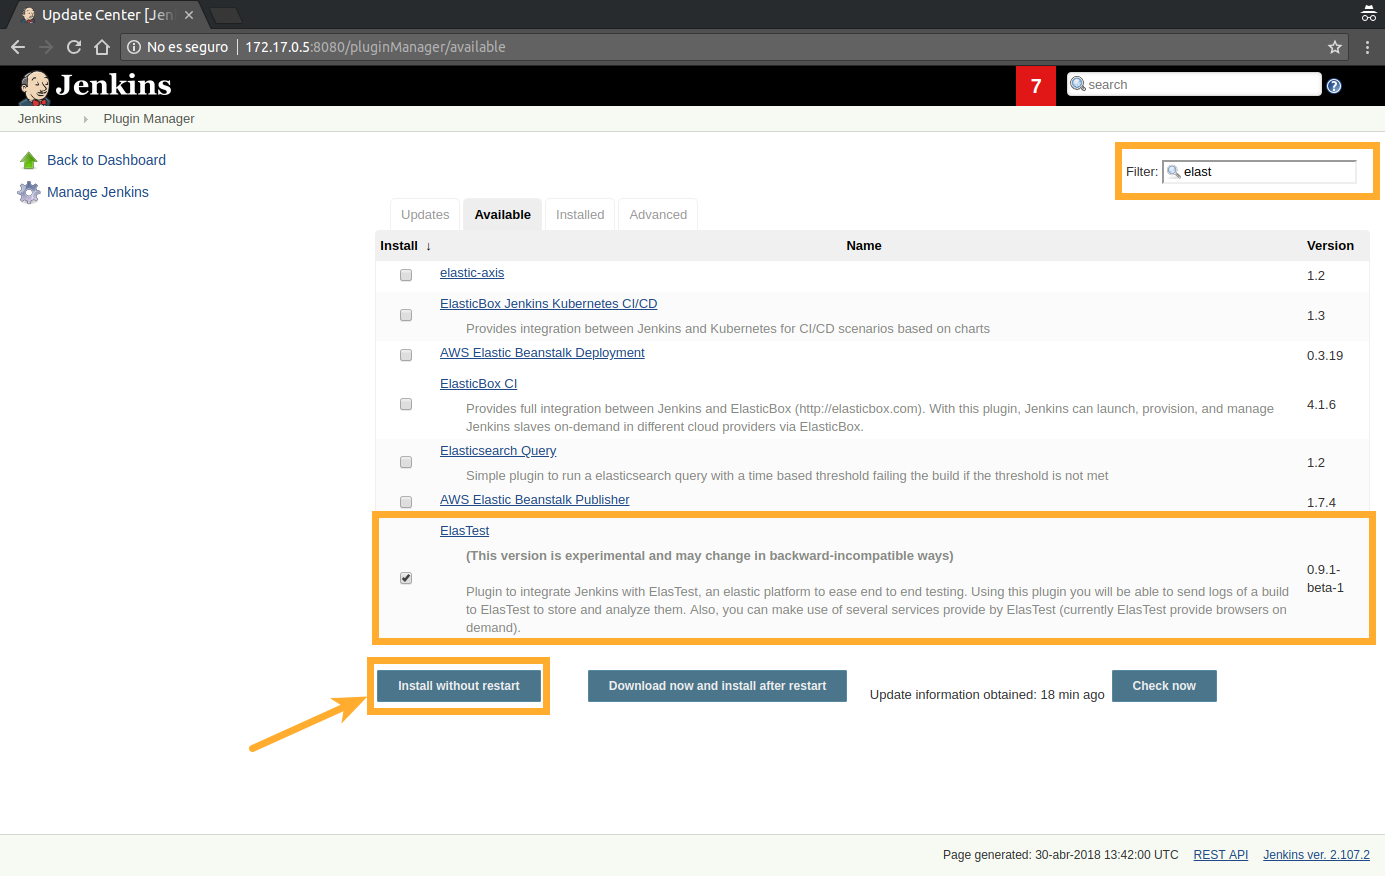
- In your Jenkins server, logged as a user with administration privileges, navigate to Manage Jenkins / Manage Plugins.
- Open the Available tab and search for elastest. The ElasTest Jenkins plugin will appear. Check the box and click the Install plugin button.
Keep reading to configure the plugin so that it can connect to your ElasTest installation.
Plugin configuration
The plugin configuration is very simple and you only have to fill in the following fields:
- ElasTest URL: complete URL of ElasTest (including protocol and port). This URL is provided by ElasTest automatically on startup. We have information on configuring the ElasTest IP (and domain).
- Username: ElasTest username (provided as a command on ElasTest startup)
- Password: ElasTest password (provided as a command on ElasTest startup)
Before you execute your first Job integrated with ElasTest, we strongly recommend to check if the connection between Jenkins and ElasTest is successfully established by using the corresponding button on the configuration page.

Launching end-to-end test
Test
Let's see how launch a TJob that makes use a web browser inside Elastest. Here we will run our API Test, which makes use of a Spring Boot Application as a SuT the application is a platform for education. Also has one test what check that a user not logged can't access to the sensible information.
First we can see the code of the normal api test. The profile_uri variable contains the URL of the application that we will atack.
TestAPIRestTemplateWithoutElasTest
public class TestAPIRestTemplateWithoutElasTest {

    final static Logger log = getLogger(lookup().lookupClass());

    protected static String profile_uri;

    @BeforeAll
    public static void setupClass() {
        profile_uri = "http://localhost:8000/api/users/{user}";
    }

    @Test
    public void checkShowProfile() throws KeyManagementException, NoSuchAlgorithmException, KeyStoreException {
        String url = profile_uri.replace("{user}", "amico");
        RestTemplate restTemplate = new RestTemplate(SSLClientFactory.getClientHttpRequestFactory(HttpClientType.HttpClient));

        HttpStatus status;
        HttpStatus expected = HttpStatus.UNAUTHORIZED;

        try {
            ResponseEntity<String> response = restTemplate.getForEntity(url, String.class);
            status = response.getStatusCode();
        } catch (HttpStatusCodeException e) {
            status = e.getStatusCode();
        }

        Assert.assertEquals("failure - expected HTTP status " + expected, expected, status);
        log.info("The response is correct");
    }

}
Now we will see the changes we need for adapt the test to ElasTest. First need add the ElasTestBase in the project, which is responsible for printing logs at the beginning and end of each test. These two logs have a specific structure and are used by ElasTest to filter the logs and metrics corresponding to each test, as well as knowing its start and end date. We explain this in more detail here
ElasTestBase
public class ElasTestBase {

    protected static final Logger logger = LoggerFactory.getLogger(ElasTestBase.class);

    @BeforeEach
    public void logStart(TestInfo testInfo) {
        logger.info("##### Start test: " + testInfo.getTestMethod().get().getName());
    }

    @AfterEach
    public void logEnd(TestInfo testInfo) {
        logger.info("##### Finish test: " + testInfo.getTestMethod().get().getName());
    }

}
In the test should extends the class ElasTestBase.
TestAPIRestTemplate
public class TestAPIRestTemplate extends ElasTestBase{

    final static Logger log = getLogger(lookup().lookupClass());

    protected static String sutUrl;
    protected static String profile_uri;

    @BeforeAll
    public static void setupClass() {
        String sutHost = System.getenv("ET_SUT_HOST");
        String sutPort = System.getenv("ET_SUT_PORT");
        String sutProtocol = System.getenv("ET_SUT_PROTOCOL");

        if (sutHost == null) {
            sutUrl = "http://localhost:8000/";
        } else {
            sutPort = sutPort != null ? sutPort : "8080";
            sutProtocol = sutProtocol != null ? sutProtocol : "http";

            sutUrl = sutProtocol + "://" + sutHost + ":" + sutPort + "/";
        }

        profile_uri = sutUrl + "api/users/{user}";
        logger.info("Webapp URL: " + sutUrl);
    }

    @Test
    public void checkShowProfile() throws KeyManagementException, NoSuchAlgorithmException, KeyStoreException {
        String url = profile_uri.replace("{user}", "amico");
        RestTemplate restTemplate = new RestTemplate(SSLClientFactory.getClientHttpRequestFactory(HttpClientType.HttpClient));

        HttpStatus status;
        HttpStatus expected = HttpStatus.UNAUTHORIZED;

        try {
            ResponseEntity<String> response = restTemplate.getForEntity(url, String.class);
            status = response.getStatusCode();
        } catch (HttpStatusCodeException e) {
            status = e.getStatusCode();
        }

        Assert.assertEquals("failure - expected HTTP status " + expected, expected, status);
        log.info("The response is correct");
    }

}
We need added the following variables:
String sutHost = System.getenv("ET_SUT_HOST");
String sutPort = System.getenv("ET_SUT_PORT");
String sutProtocol = System.getenv("ET_SUT_PROTOCOL");
This variables we supply information about the SUT.
ET_SUT_HOST,ET_SUT_PORTandET_SUT_PROTOCOLvariables will be the IP, port and protocol of our SuT respectively. ElasTest will automatically inject the right value (Know more about Environment Variables)
Elastest pipeline
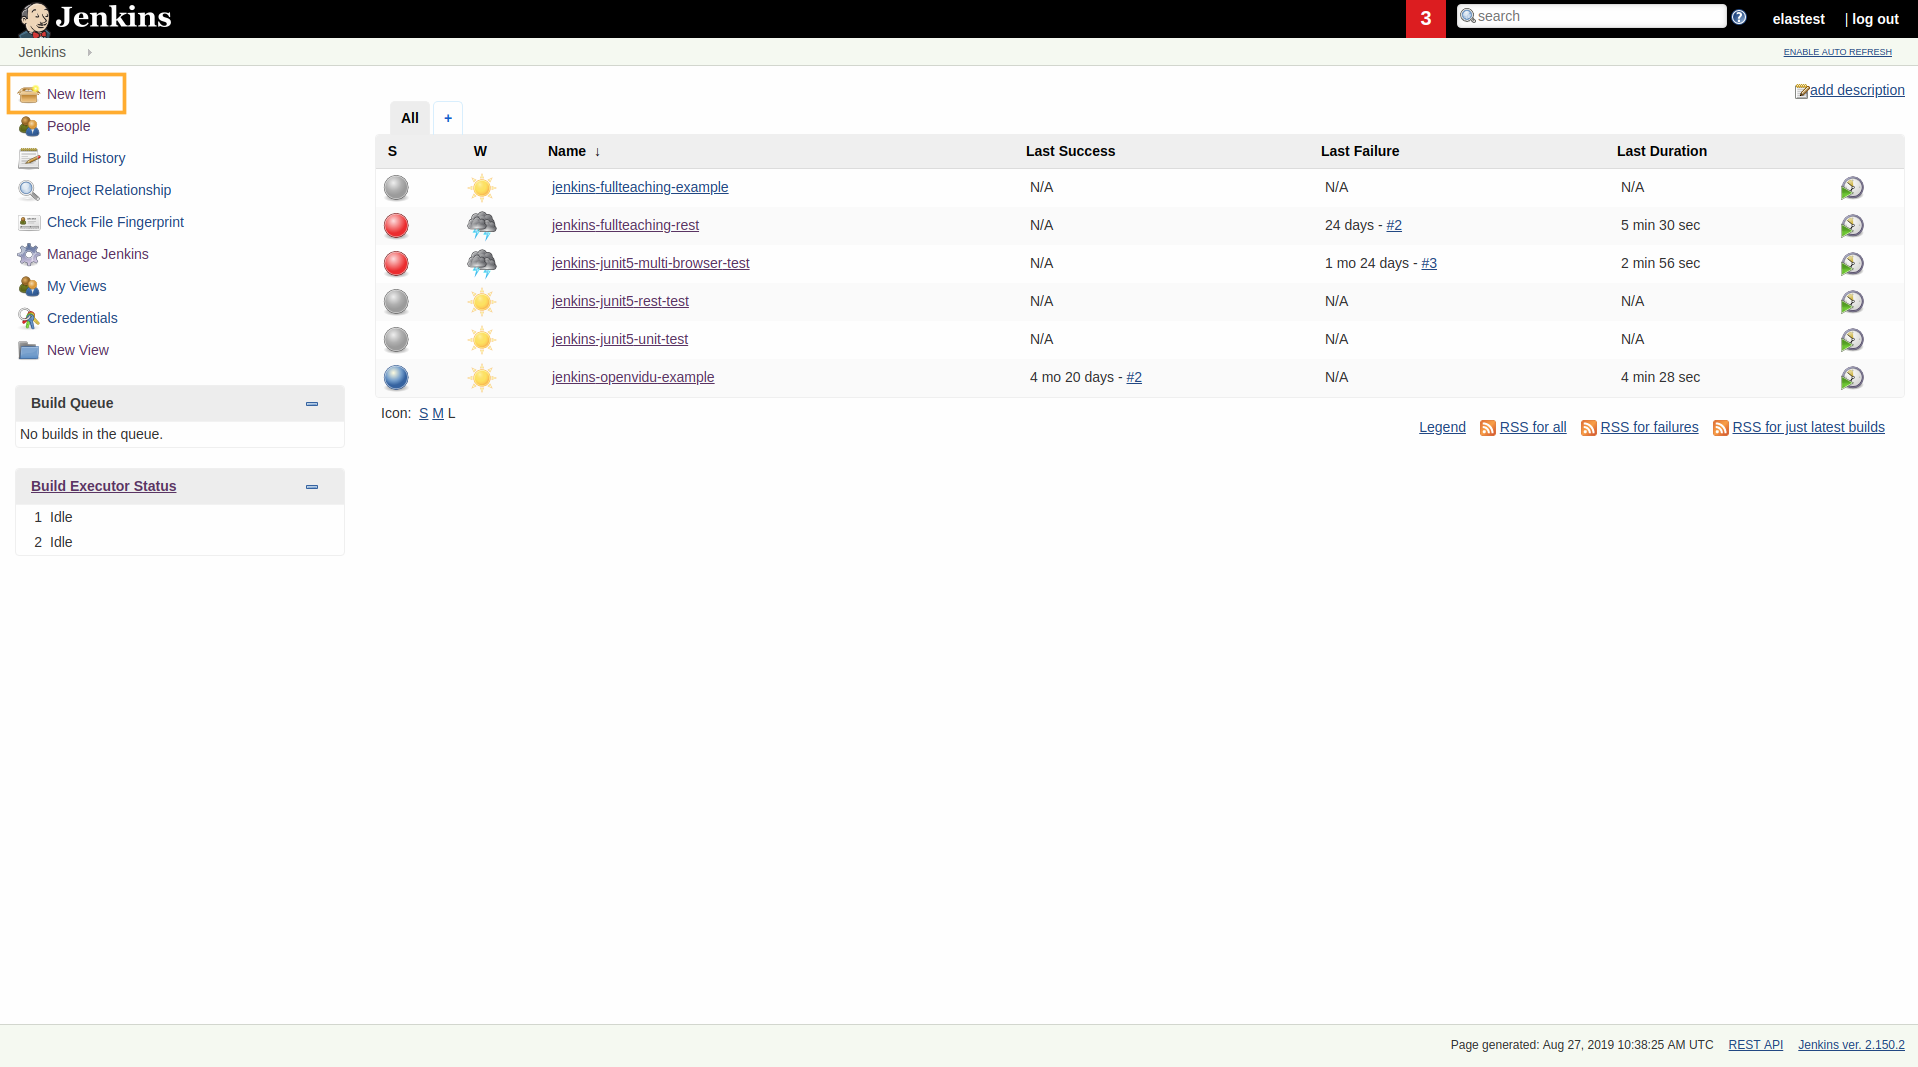
To run our tests using Jenkins in Elastest, first open the Jenkins and click in new Item
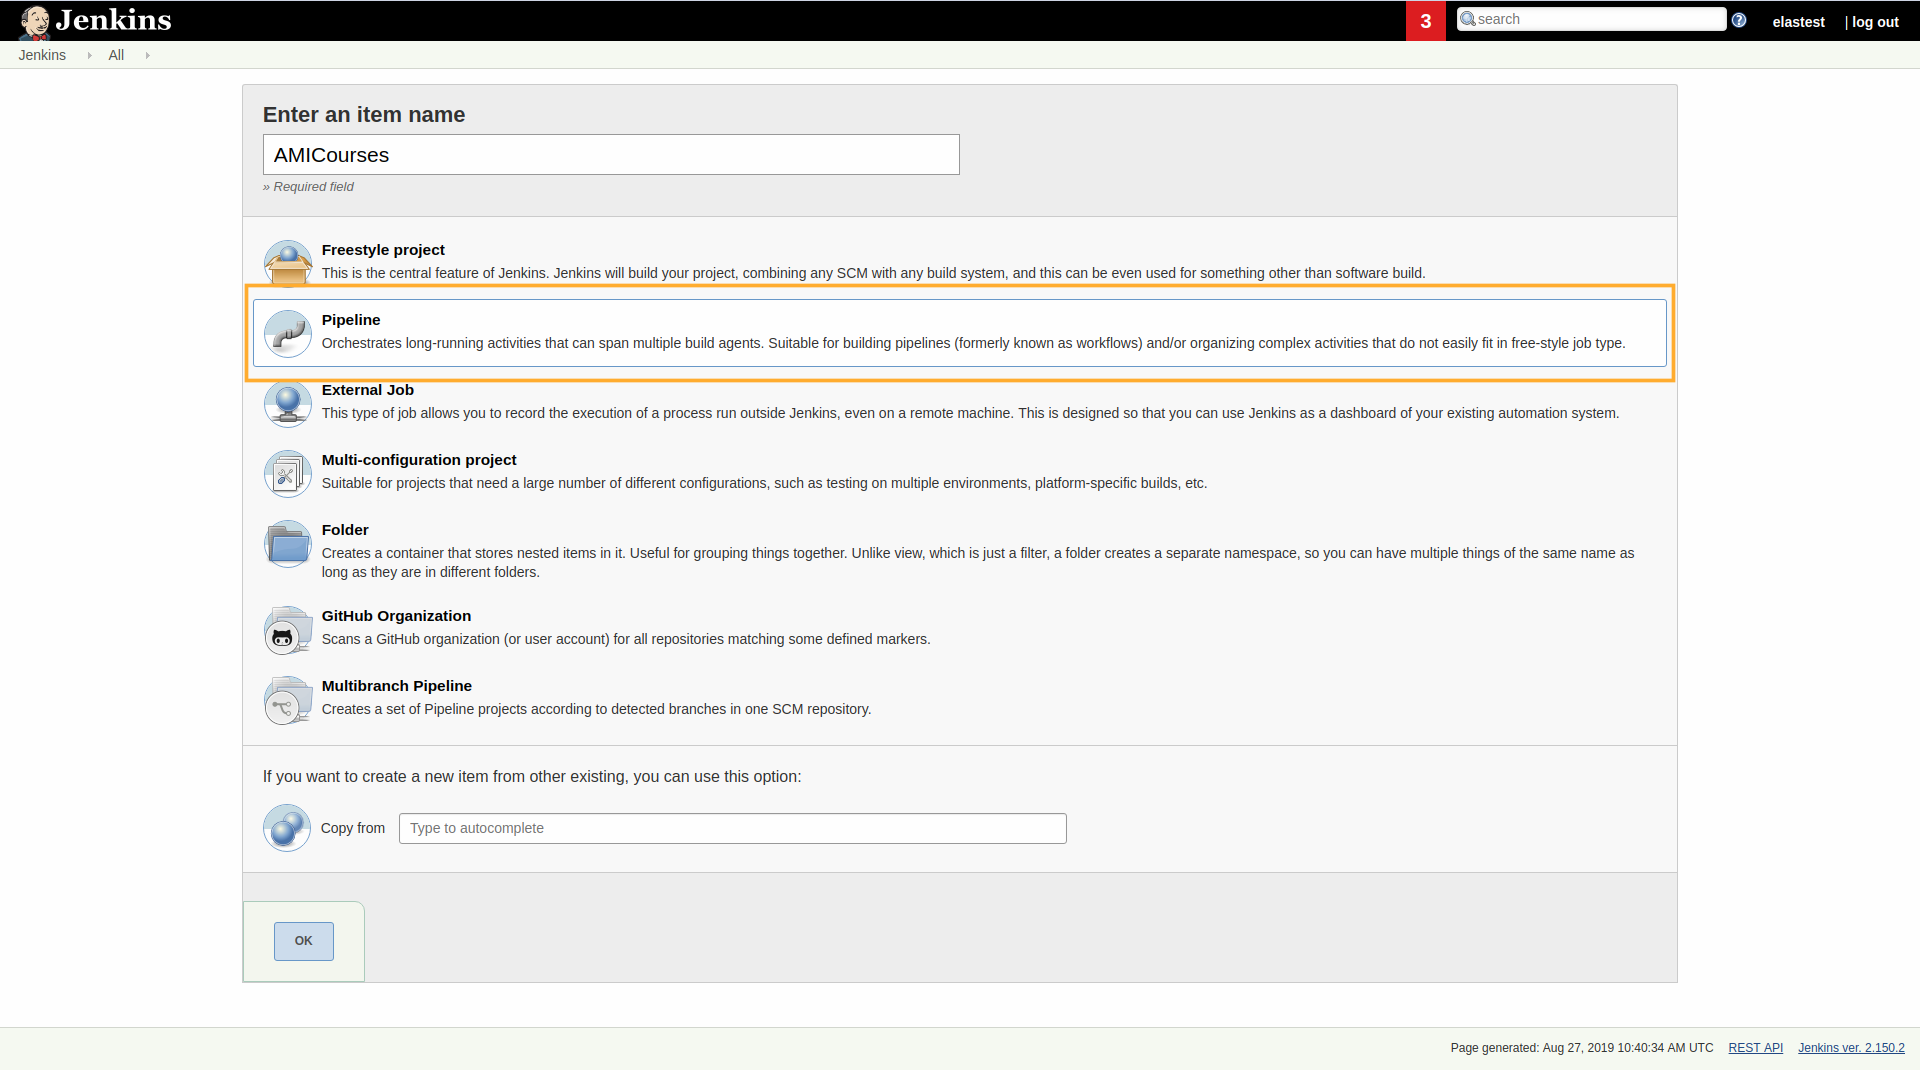
Write the name of the item: AMICourses and select Pipeline
Normal Pipeline
We will see the normal Pipeline for used this Test in Jenkins.
node{
    stage('Setting environment'){
        git "https://github.com/elastest-experiments/webapp-2.git"
    }

    try{
        stage('Start Sut') {
            echo 'Running SUT'
            sh "cd docker-compose; export AMICO_IMAGE=webapp-2-fixed-profile; docker-compose up -d && ./wait-app.sh 8000"
        }
        stage("Run Tests") {
            echo 'Running test'
            mvnHome = tool 'M3.3.9'
            sh "cd AMICOServer; '${mvnHome}/bin/mvn' -Dtest=TestAPIRestTemplate -B test"
            step([$class: 'JUnitResultArchiver', testResults: '**/target/surefire-reports/TEST-*.xml'])
        }
    } finally {
        echo 'Stopping SUT'
        sh "cd docker; docker-compose down"
    }
}
The example above can be split into the following sections:
- Start SUT : This block started the SUT application. The script
wait-app.shwait for theSUTis ready.
stage('Start Sut') {
    echo 'Running SUT'
    sh "cd docker-compose; export AMICO_IMAGE=webapp-2-fixed-profile; docker-compose up -d && ./wait-app.sh 8000"
}
- Run Test : The tests execute if the SUT working correctly.
stage("Run Tests") {
    echo 'Running test'
    mvnHome = tool 'M3.3.9'
    sh "cd AMICOServer; '${mvnHome}/bin/mvn' -Dtest=TestAPIRestTemplate -B test"
    step([$class: 'JUnitResultArchiver', testResults: '**/target/surefire-reports/TEST-*.xml'])
}
- Stop SUT : The SUT will stop when the test is finished.
} finally {
    echo 'Stopping SUT'
    sh "cd docker; docker-compose down"
}
ElasTest Pipeline
Now we will see the changes we need for adapt the Pipeline to ElasTest.
node{
    def sutIp
    elastest(surefireReportsPattern: '**/target/surefire-reports/TEST-*.xml', monitoring: true, project: 'Jenkins Examples') {
        stage("Setting environment") {
            echo 'Environment variables'
            sh "env"
            git "https://github.com/elastest-experiments/webapp-2.git"
        }
        try {
            stage("Start Sut") {
                sh "cd docker-compose; export AMICO_IMAGE=webapp-2-fixed-profile; docker-compose --no-ansi -p ${env.ET_SUT_CONTAINER_NAME} up -d"
                sutContainerName = env.ET_SUT_CONTAINER_NAME + "_webapp2_1";
                sutNetwork = getFirstNetwork(sutContainerName)
                sutIp = containerIp(sutContainerName,network)

                echo 'Sut ip: '+ sutIp
                sh 'docker run -e IP=' + sutIp + ' -e PORT=8000 --network=' + sutNetwork + ' elastest/etm-check-service-up'
            }
            stage("Run Tests") {
                withEnv(['ET_SUT_HOST=' + sutIp, 'ET_SUT_PORT=8000']) {
                    echo 'Running test'
                    mvnHome = tool 'M3.3.9'
                    sh "cd AMICOServer; '${mvnHome}/bin/mvn' -Dtest=TestAPIRestTemplate -B test"
                    step([$class: 'JUnitResultArchiver', testResults: '**/target/surefire-reports/TEST-*.xml'])
                }
            }
        } finally {
                echo 'Stopping SUT'
                sh "cd docker; docker-compose --no-ansi -p ${env.ET_SUT_CONTAINER_NAME} down"
        }
    }
}


def getFirstNetwork(containerName) {
    echo "Inside getFirstNetwork function"
    network = sh (
        script: "docker inspect " + containerName + " -f \"{{json .NetworkSettings.Networks}}\" | awk \"{sub(/:.*/,\\\"\\\")}1\" | awk \"{sub(/\\\"/,\\\"\\\")}1\" | awk \"{sub(/\\\"/,\\\"\\\")}1\" | awk \"{sub(/{/,\\\"\\\")}1\"",
        returnStdout: true
    ).trim()

    echo containerName+" Network = " + network;
    return network;
}

def containerIp(containerName, network) {
    echo "Inside containerIp function"
    containerIp = sh (
        script: "docker inspect --format=\"{{.NetworkSettings.Networks." + network + ".IPAddress}}\" "+ containerName,
        returnStdout: true
    ).trim()

    echo containerName+" IP = " + containerIp;
    return containerIp;
}
The example above can be split into the following sections:
- ElasTest plugin block with configuration : this block will contain all the steps that the test must follow, as well as the necessary configuration options.
node{
    elastest(surefireReportsPattern: '**/target/surefire-reports/TEST-*.xml', monitoring: true, project: 'Jenkins Examples') {
        .......
    }
}
- Sut configuration : The SUT must be started, passing the
${env.ET_SUT_CONTAINER_NAME}env variable (provided by ElasTest) as name of the container. This will allow ElasTest to receive logs and metrics from the Sut.
sh "cd docker-compose; export AMICO_IMAGE=webapp-2-fixed-profile; docker-compose --no-ansi -p ${env.ET_SUT_CONTAINER_NAME} up -d"
sutContainerName = env.ET_SUT_CONTAINER_NAME + "_webapp2_1";
sutNetwork = getFirstNetwork(sutContainerName)
sutIp = containerIp(sutContainerName,network)
- Wait for Sut : You have to obtain the Sut network and ip and run check image (elastest/etm-check-service-up) provided by ElasTest to wait for the Sut to be ready to be used. This step is not required, you can wait in other ways or not do it, but for this example we do it.
echo 'Sut ip: '+ sutIp
sh 'docker run -e IP=' + sutIp + ' -e PORT=8000 --network=' + sutNetwork + ' elastest/etm-check-service-up'
We need added the following code in the Pipeline:
def getFirstNetwork(containerName) {
    echo "Inside getFirstNetwork function"
    network = sh (
        script: "docker inspect " + containerName + " -f \"{{json .NetworkSettings.Networks}}\" | awk \"{sub(/:.*/,\\\"\\\")}1\" | awk \"{sub(/\\\"/,\\\"\\\")}1\" | awk \"{sub(/\\\"/,\\\"\\\")}1\" | awk \"{sub(/{/,\\\"\\\")}1\"",
        returnStdout: true
    ).trim()

    echo containerName+" Network = " + network;
    return network;
}

def containerIp(containerName, network) {
    echo "Inside containerIp function"
    containerIp = sh (
        script: "docker inspect --format=\"{{.NetworkSettings.Networks." + network + ".IPAddress}}\" "+ containerName,
        returnStdout: true
    ).trim()

    echo containerName+" IP = " + containerIp;
    return containerIp;
}
This code obtain the network and the ip of the SUT container this information is needed for wait the SUT is ready to launch the Tests. It's functions has like the script wait-app.sh we seen in the normal Pipeline.
- Test Execution : Finally, the tests should be executed to verify that the SUT is working correctly. Remember that you have to configure the Sut ip as an environment variable or pass it as a maven property so that the test knows where the SUT is.
stage("Run Tests") {
    withEnv(['ET_SUT_HOST=' + sutIp, 'ET_SUT_PORT=8000']) {
        echo 'Running test'
        mvnHome = tool 'M3.3.9'
        sh "cd AMICOServer; '${mvnHome}/bin/mvn' -Dtest=TestAPIRestTemplate -B test"
        step([$class: 'JUnitResultArchiver', testResults: '**/target/surefire-reports/TEST-*.xml'])
    }
}
- Stop Sut : The SUT will stop when the test is finished, passing the
${env.ET_SUT_CONTAINER_NAME}env variable (provided by ElasTest) as name of the container.
} finally {
        echo 'Stopping SUT'
        sh "cd docker; docker-compose --no-ansi -p ${env.ET_SUT_CONTAINER_NAME} down"
}
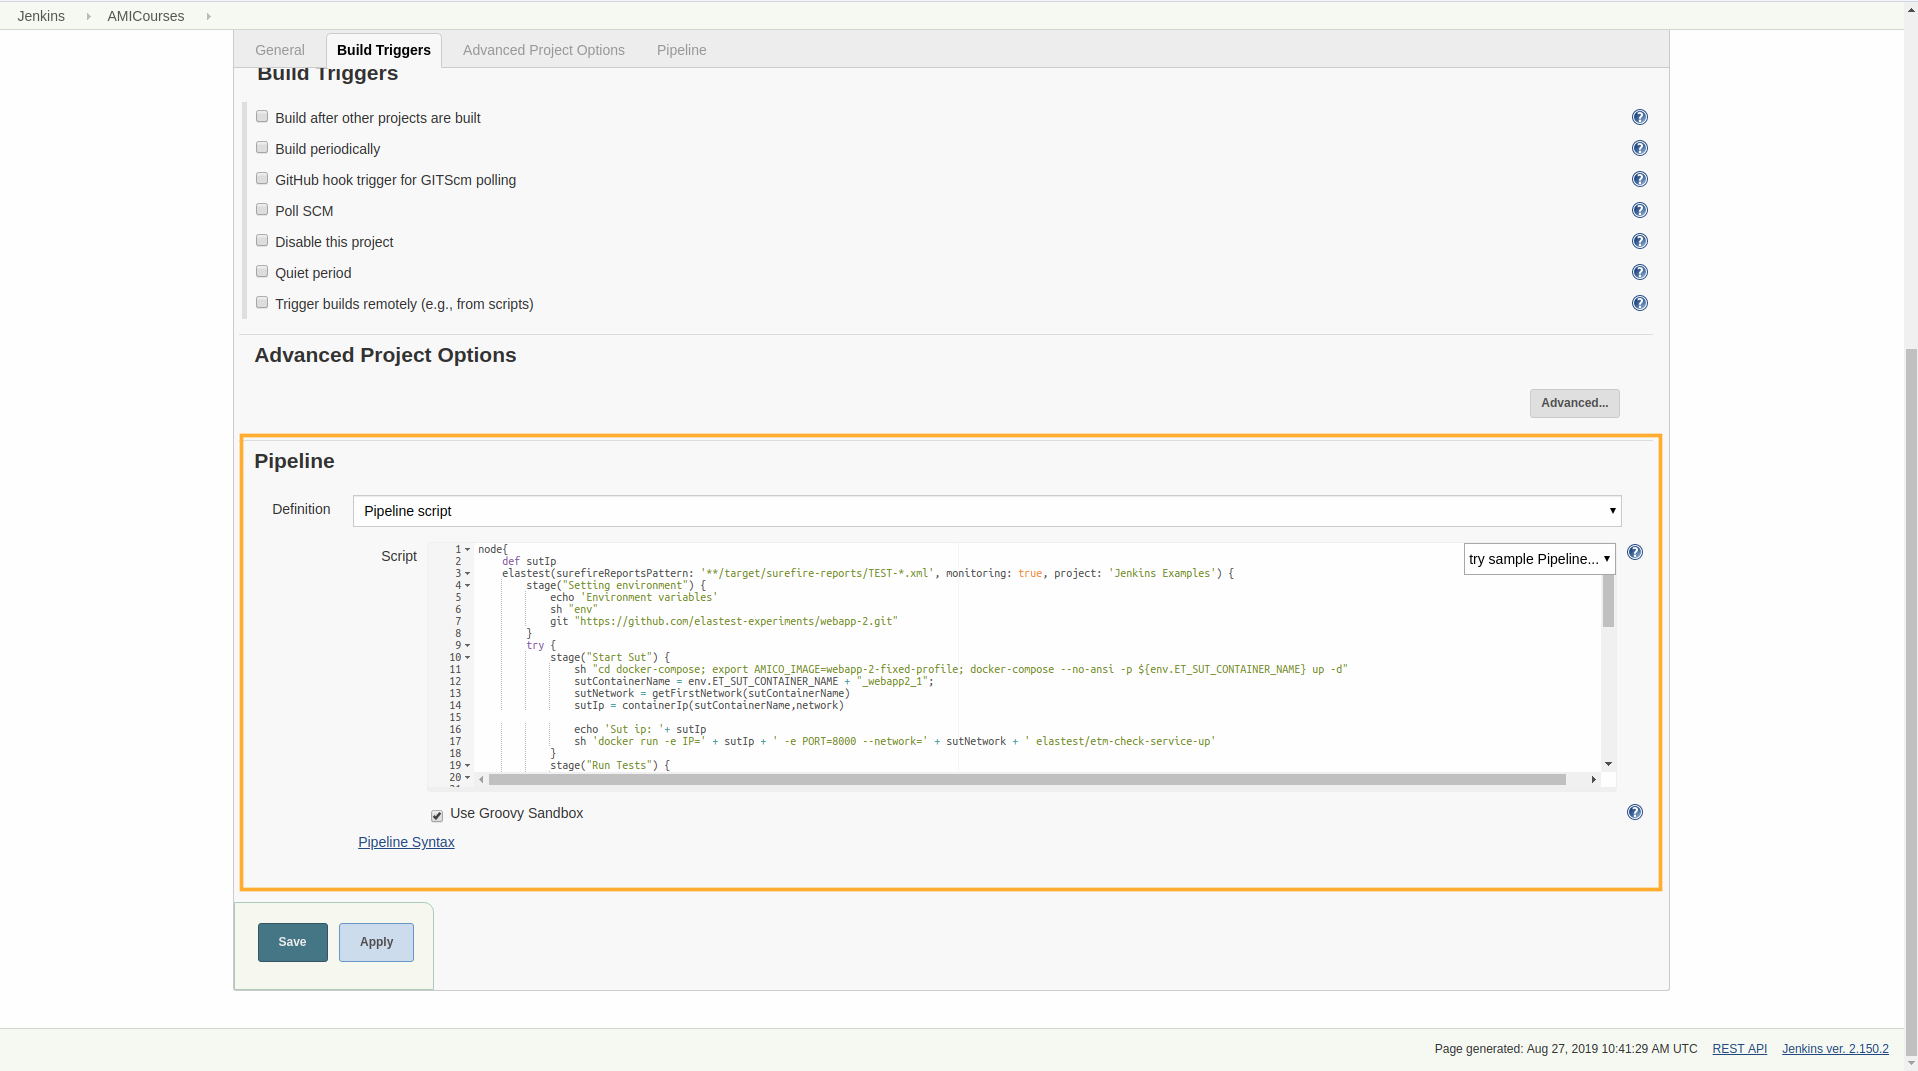
Copy the ElasTest Pipeline and paste in the Pipeline section, as follows:
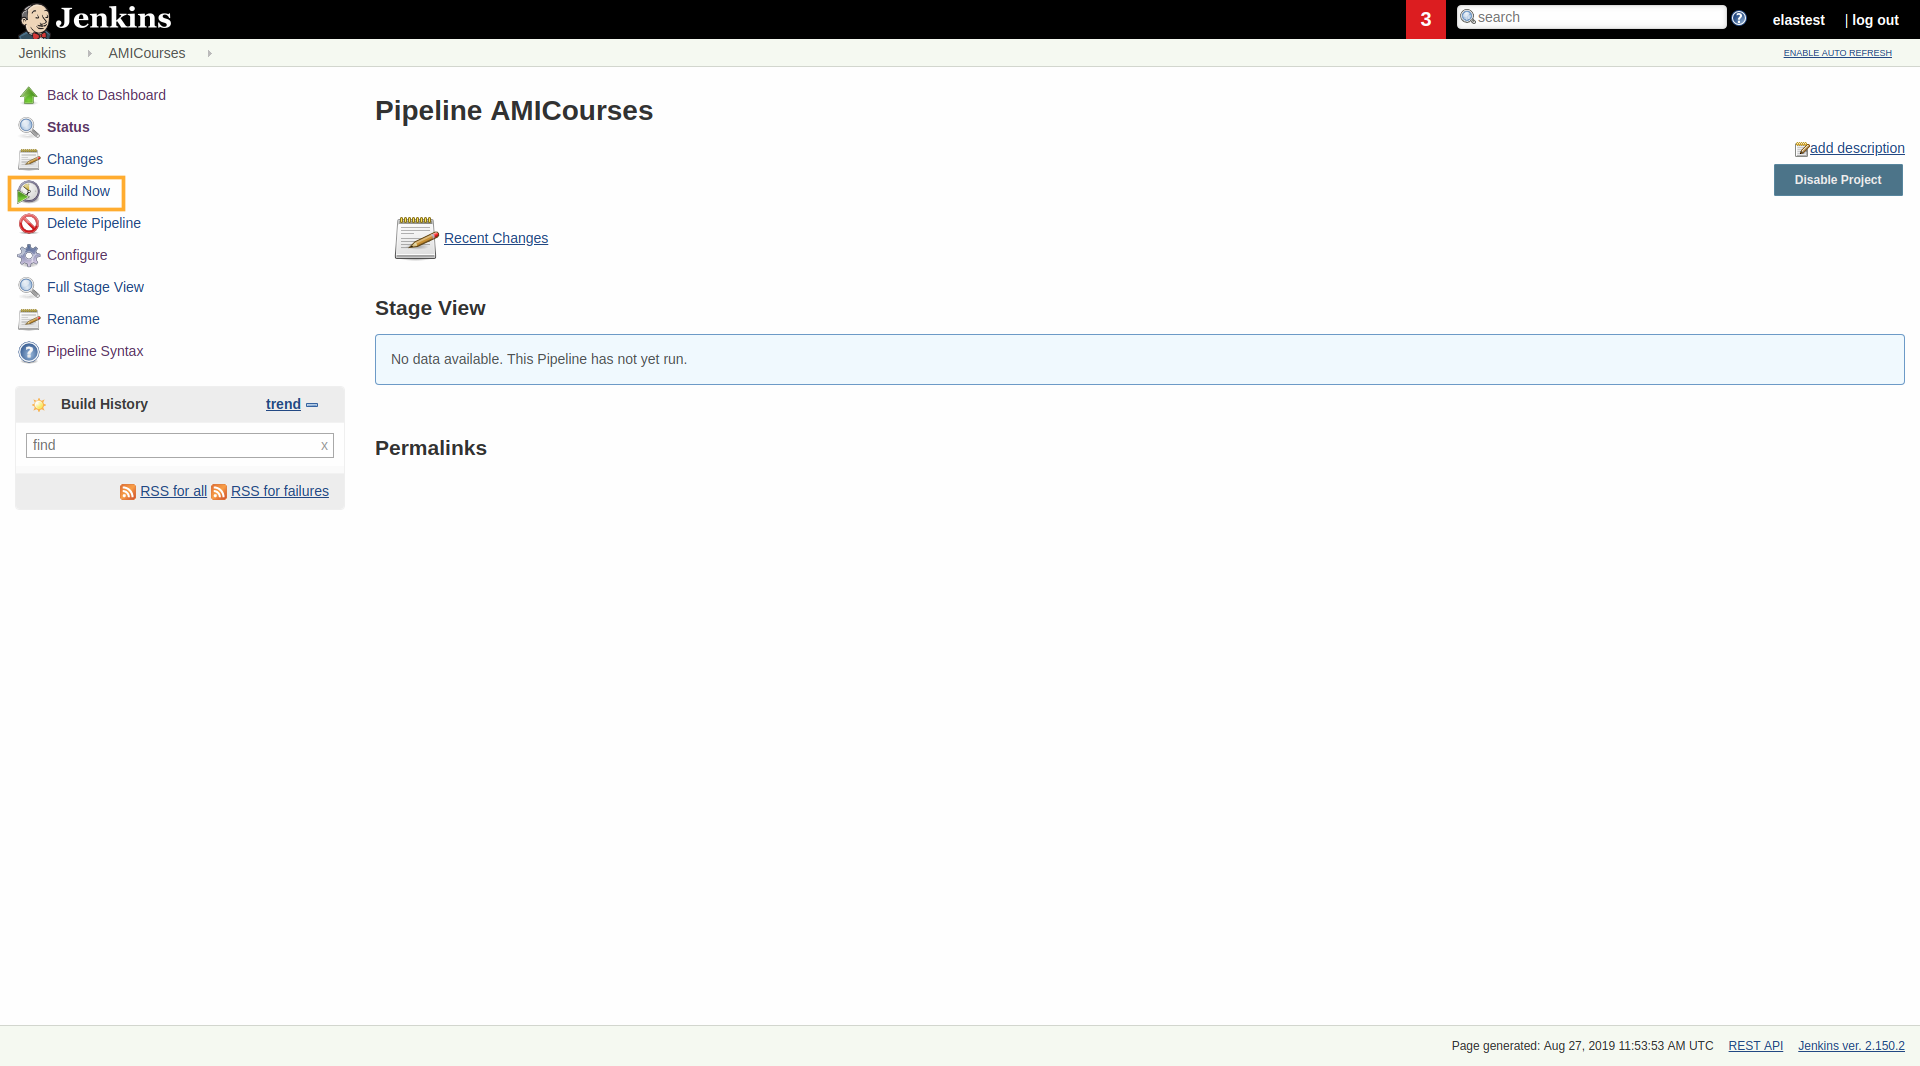
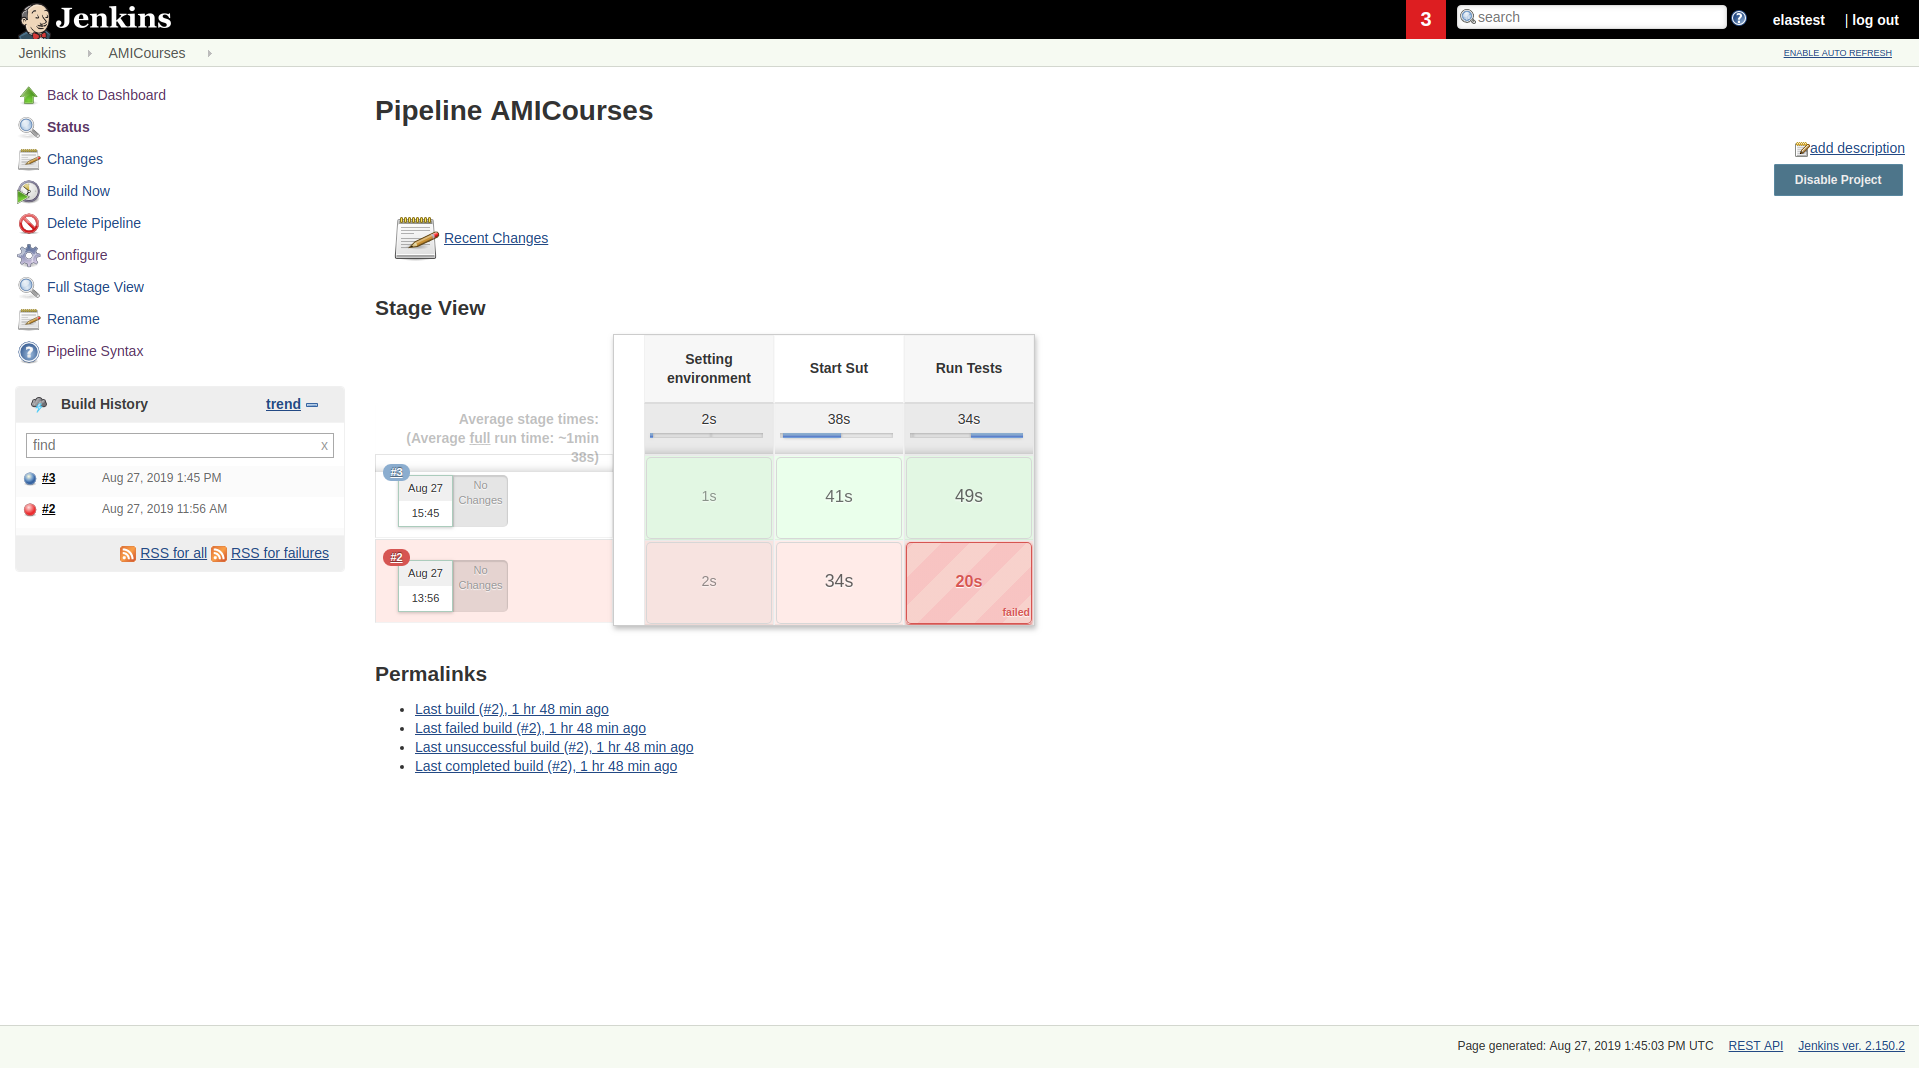
When the Job is created, we will click in Build Now button:
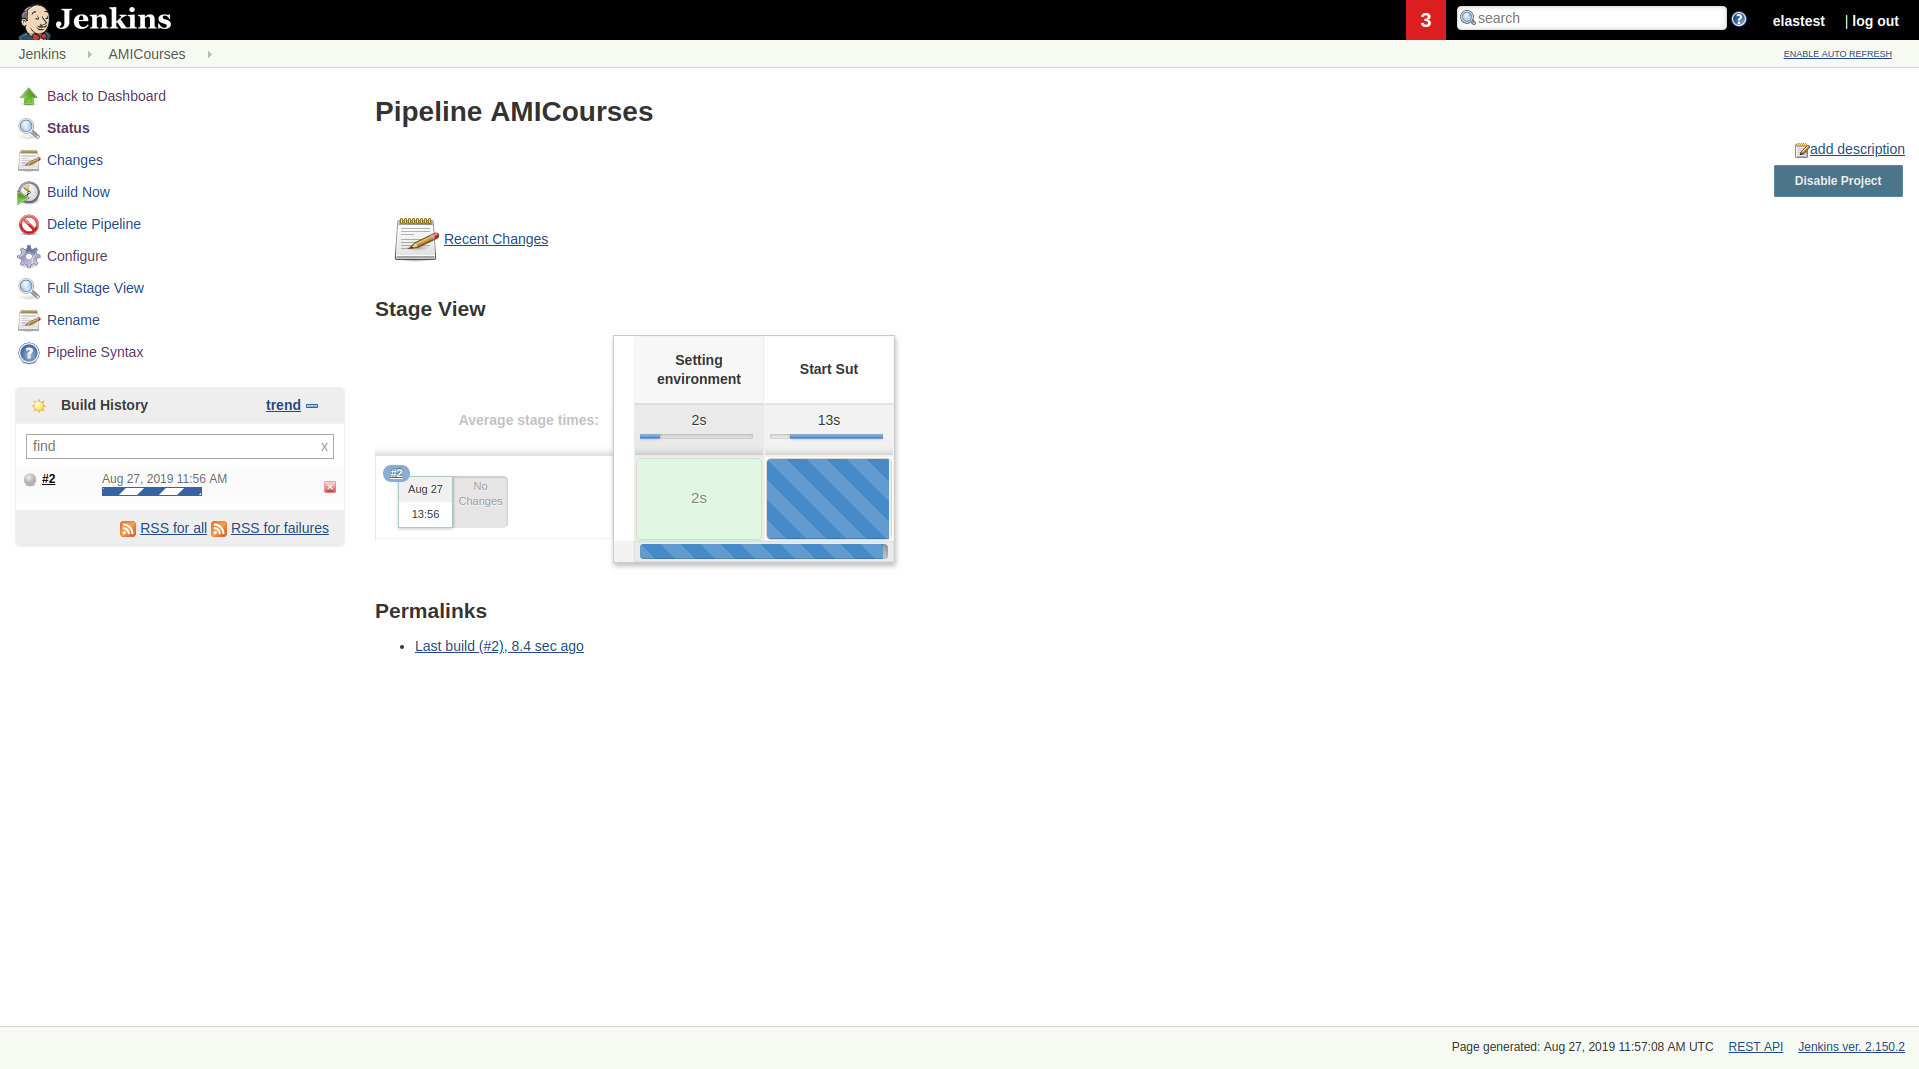
After pressing the button, you will see the job running on Jenkins:
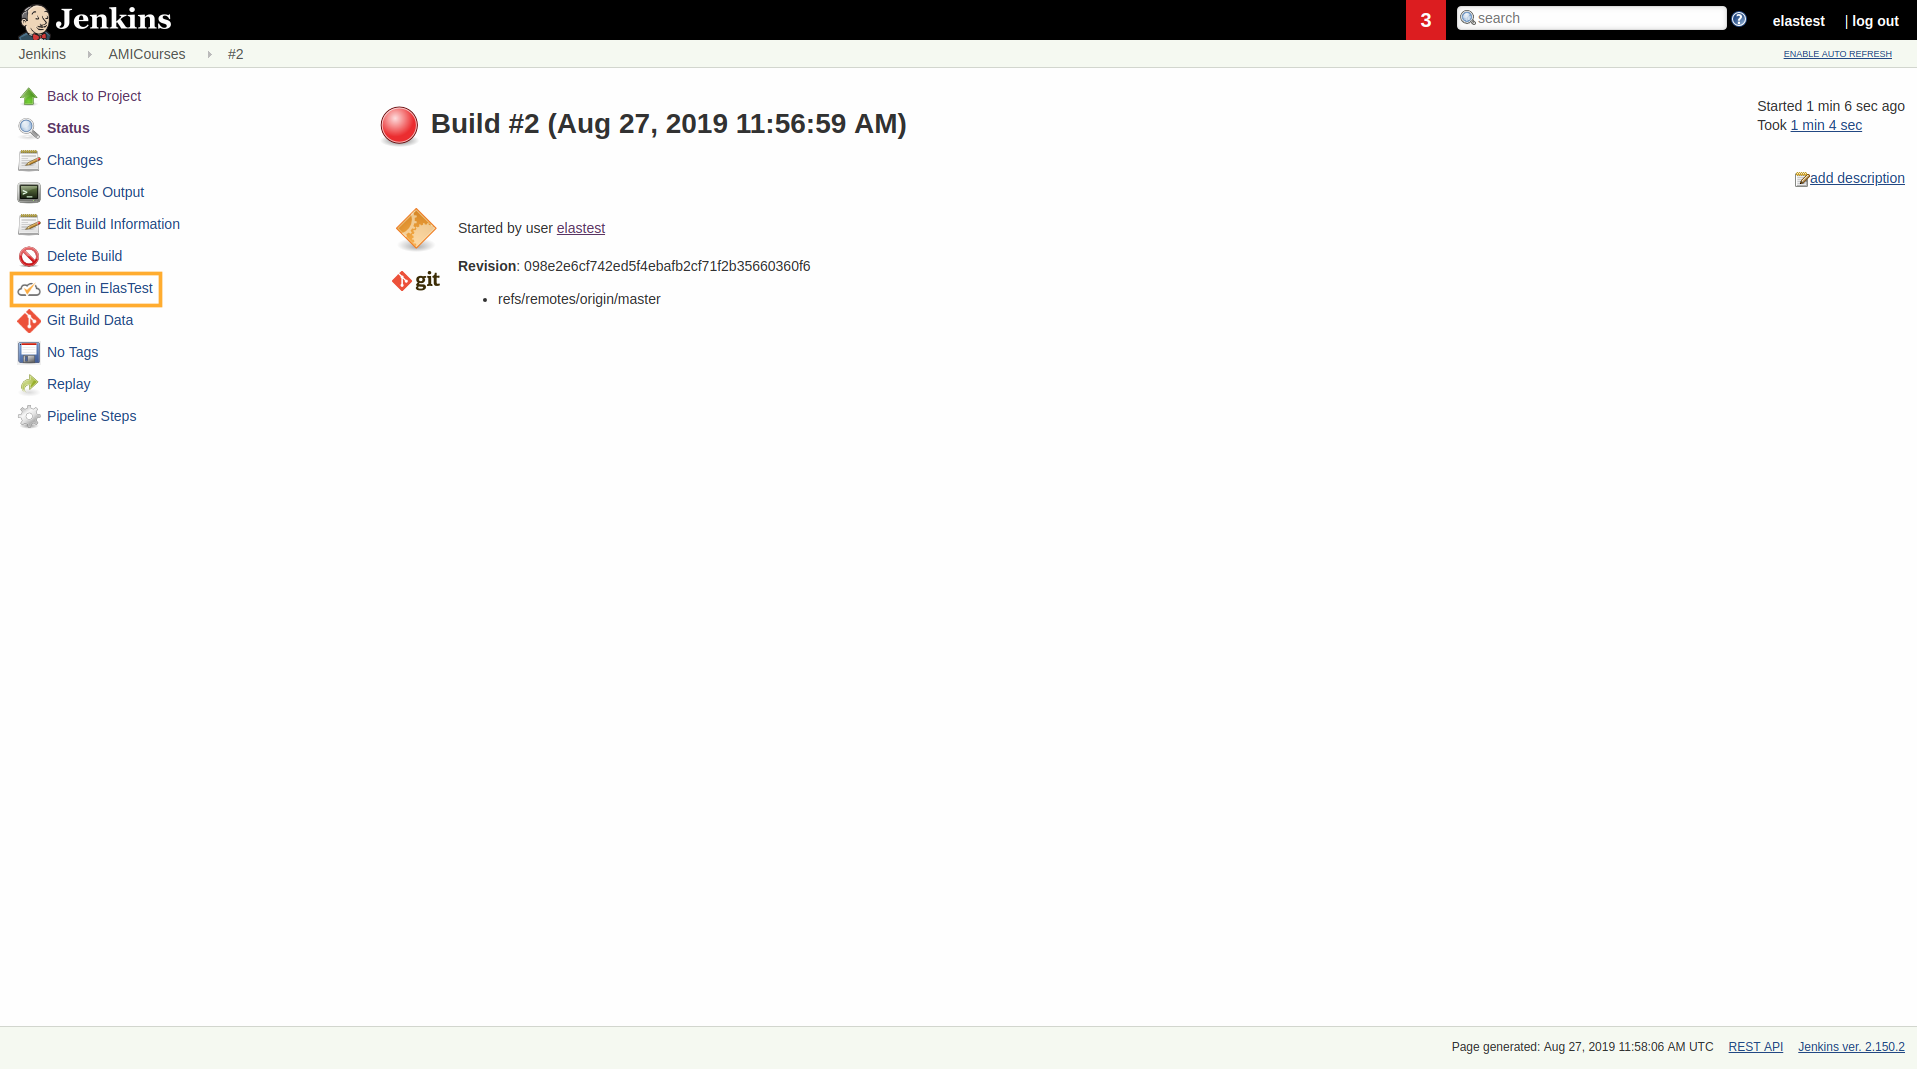
Entering the build page, you will see the Open in ElasTest button, where you can see the execution page in ElasTest (If the button does not appear refresh the page, it may take a while). ElasTest will have created a project called Jenkins Examples also you show the project in this section.
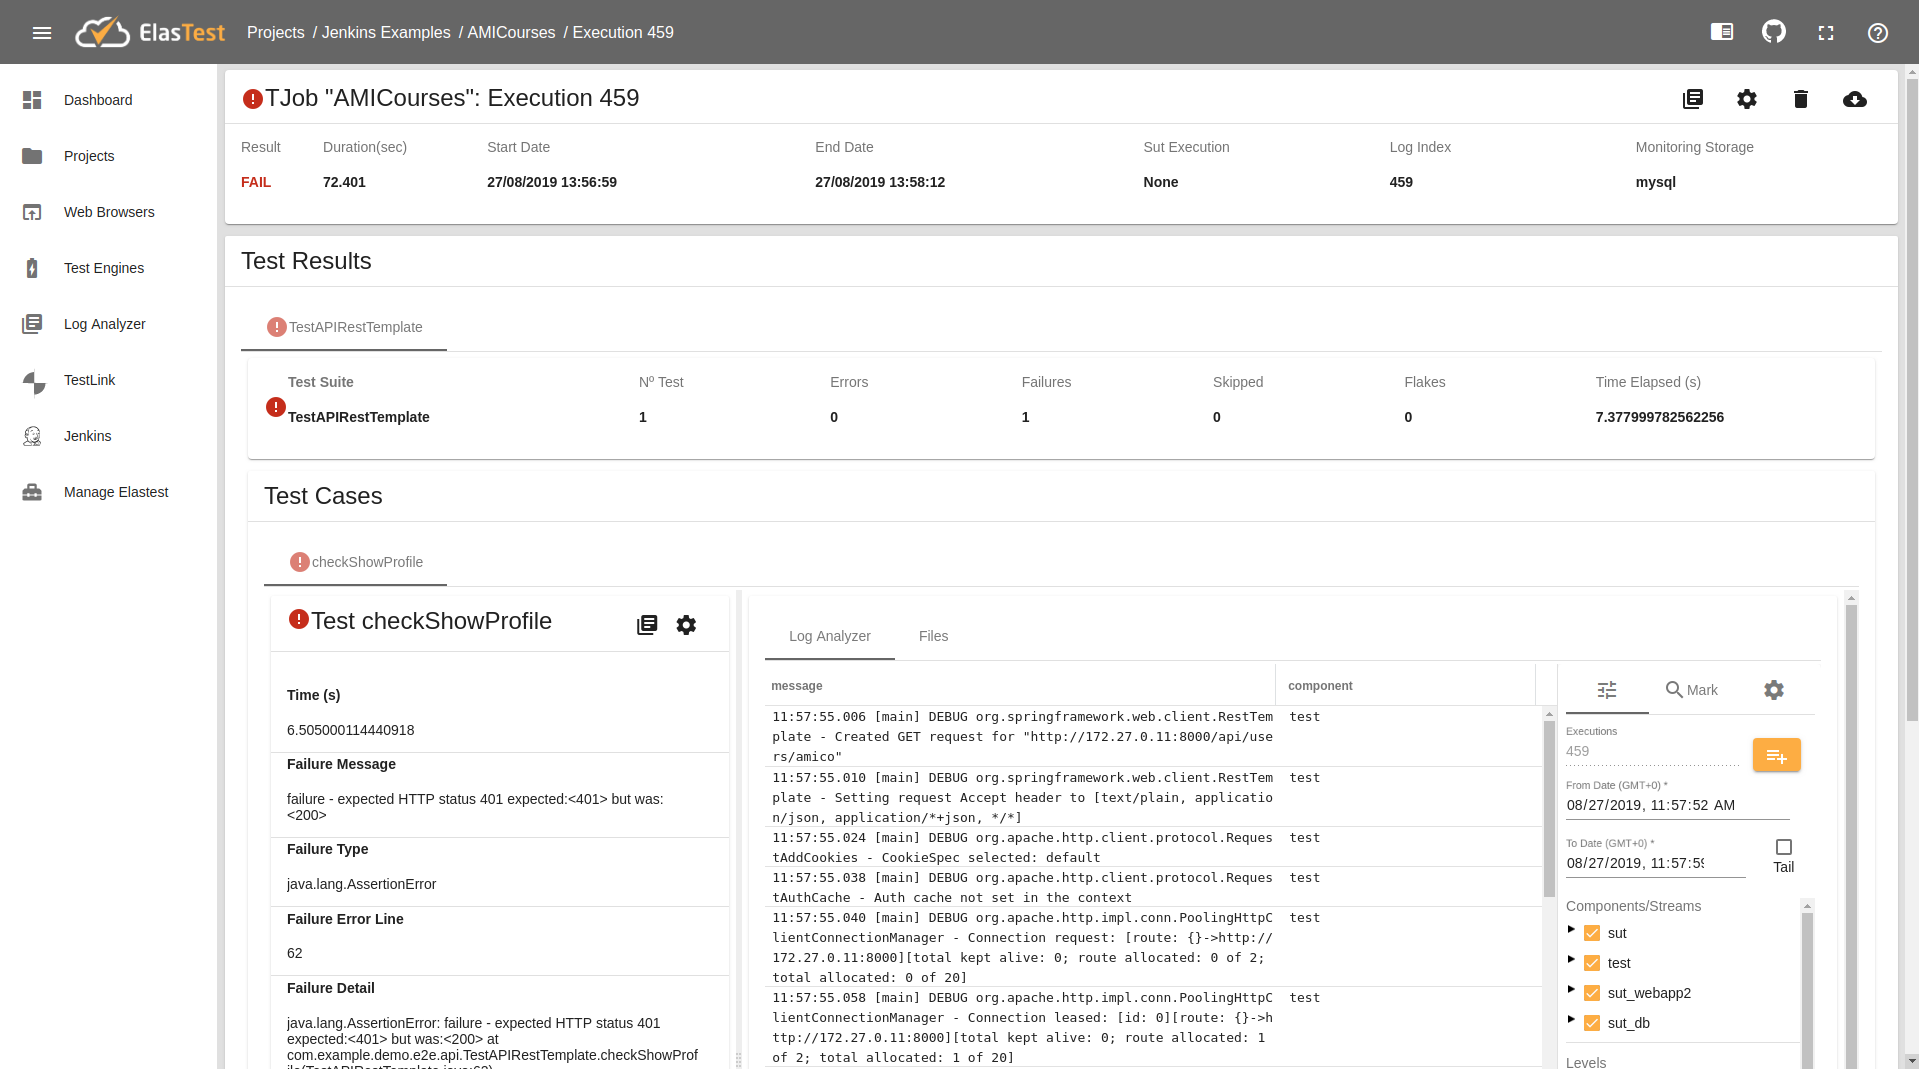
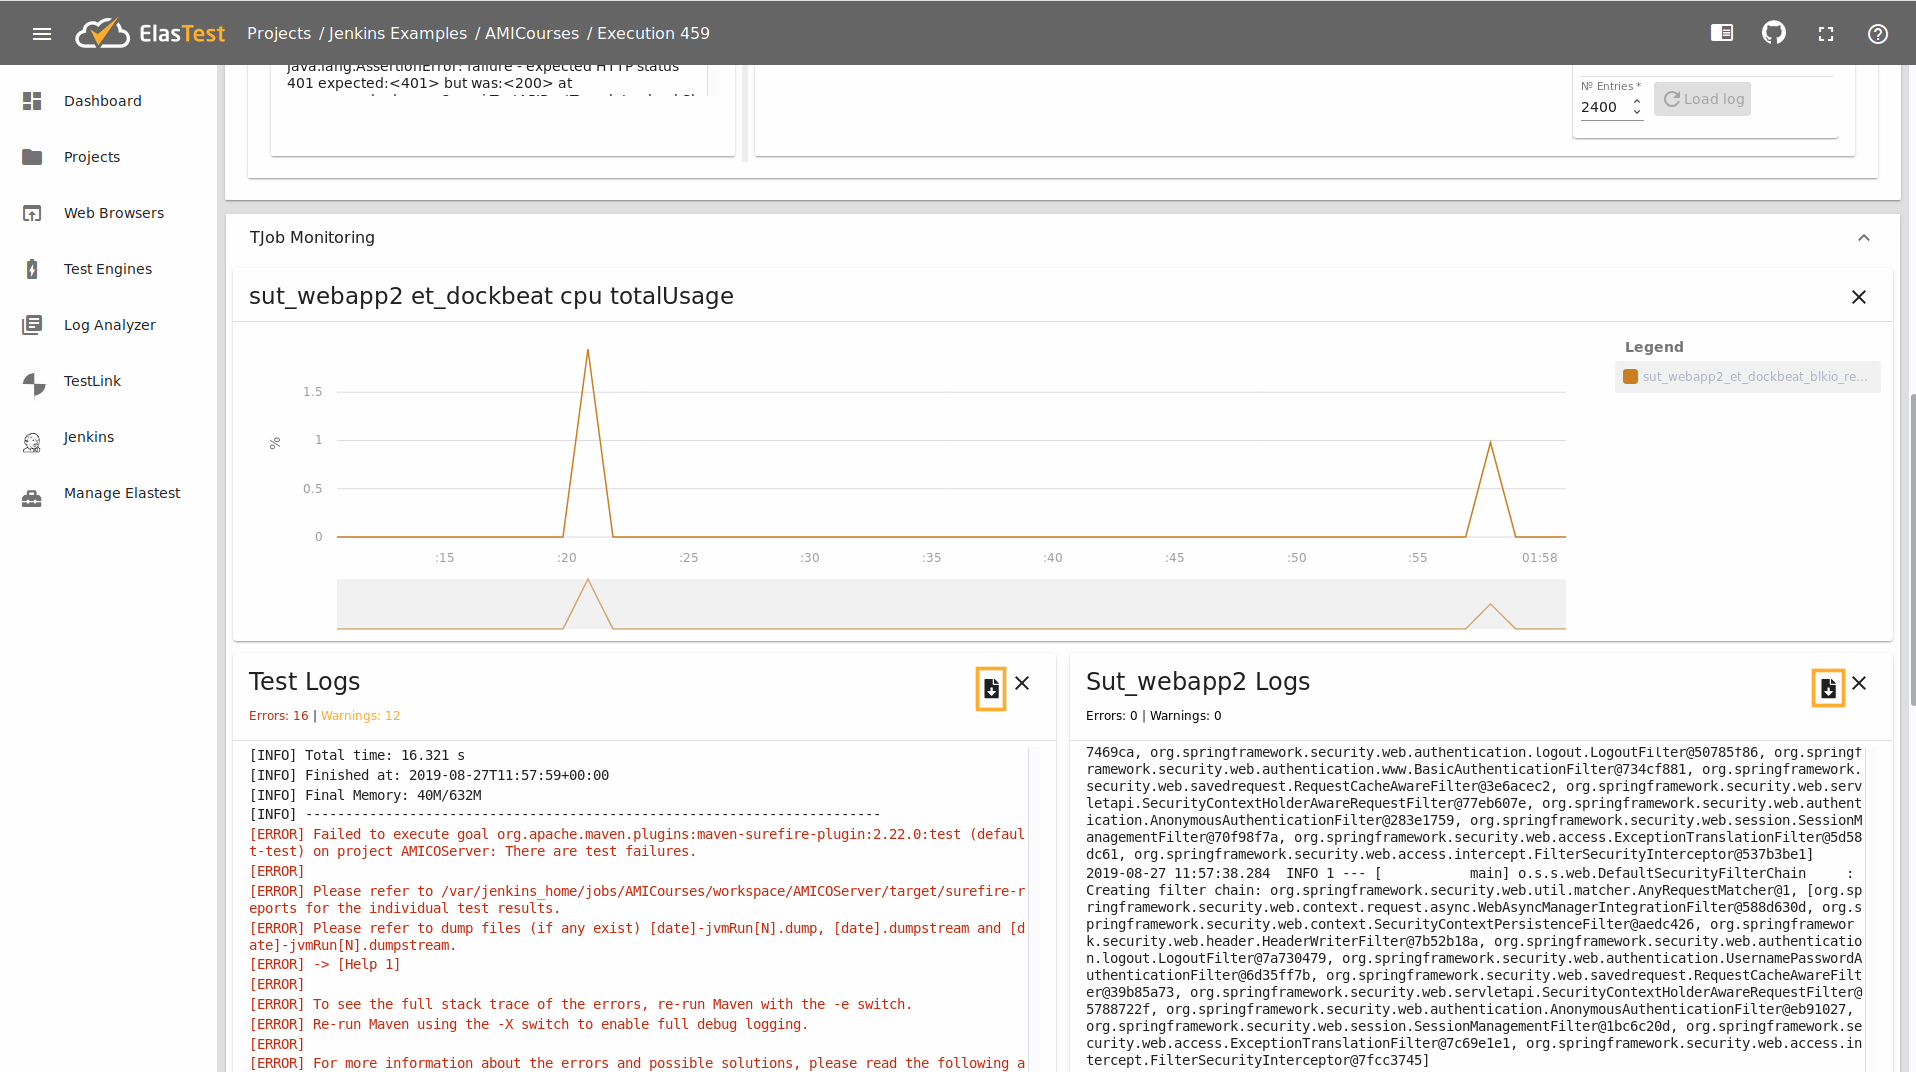
Collecting logs & metrics automatically
ElasTest collect logs and metrics automatically this will show in the section TJob Monitoring of the TJob. There logs may download if click in the button marked.
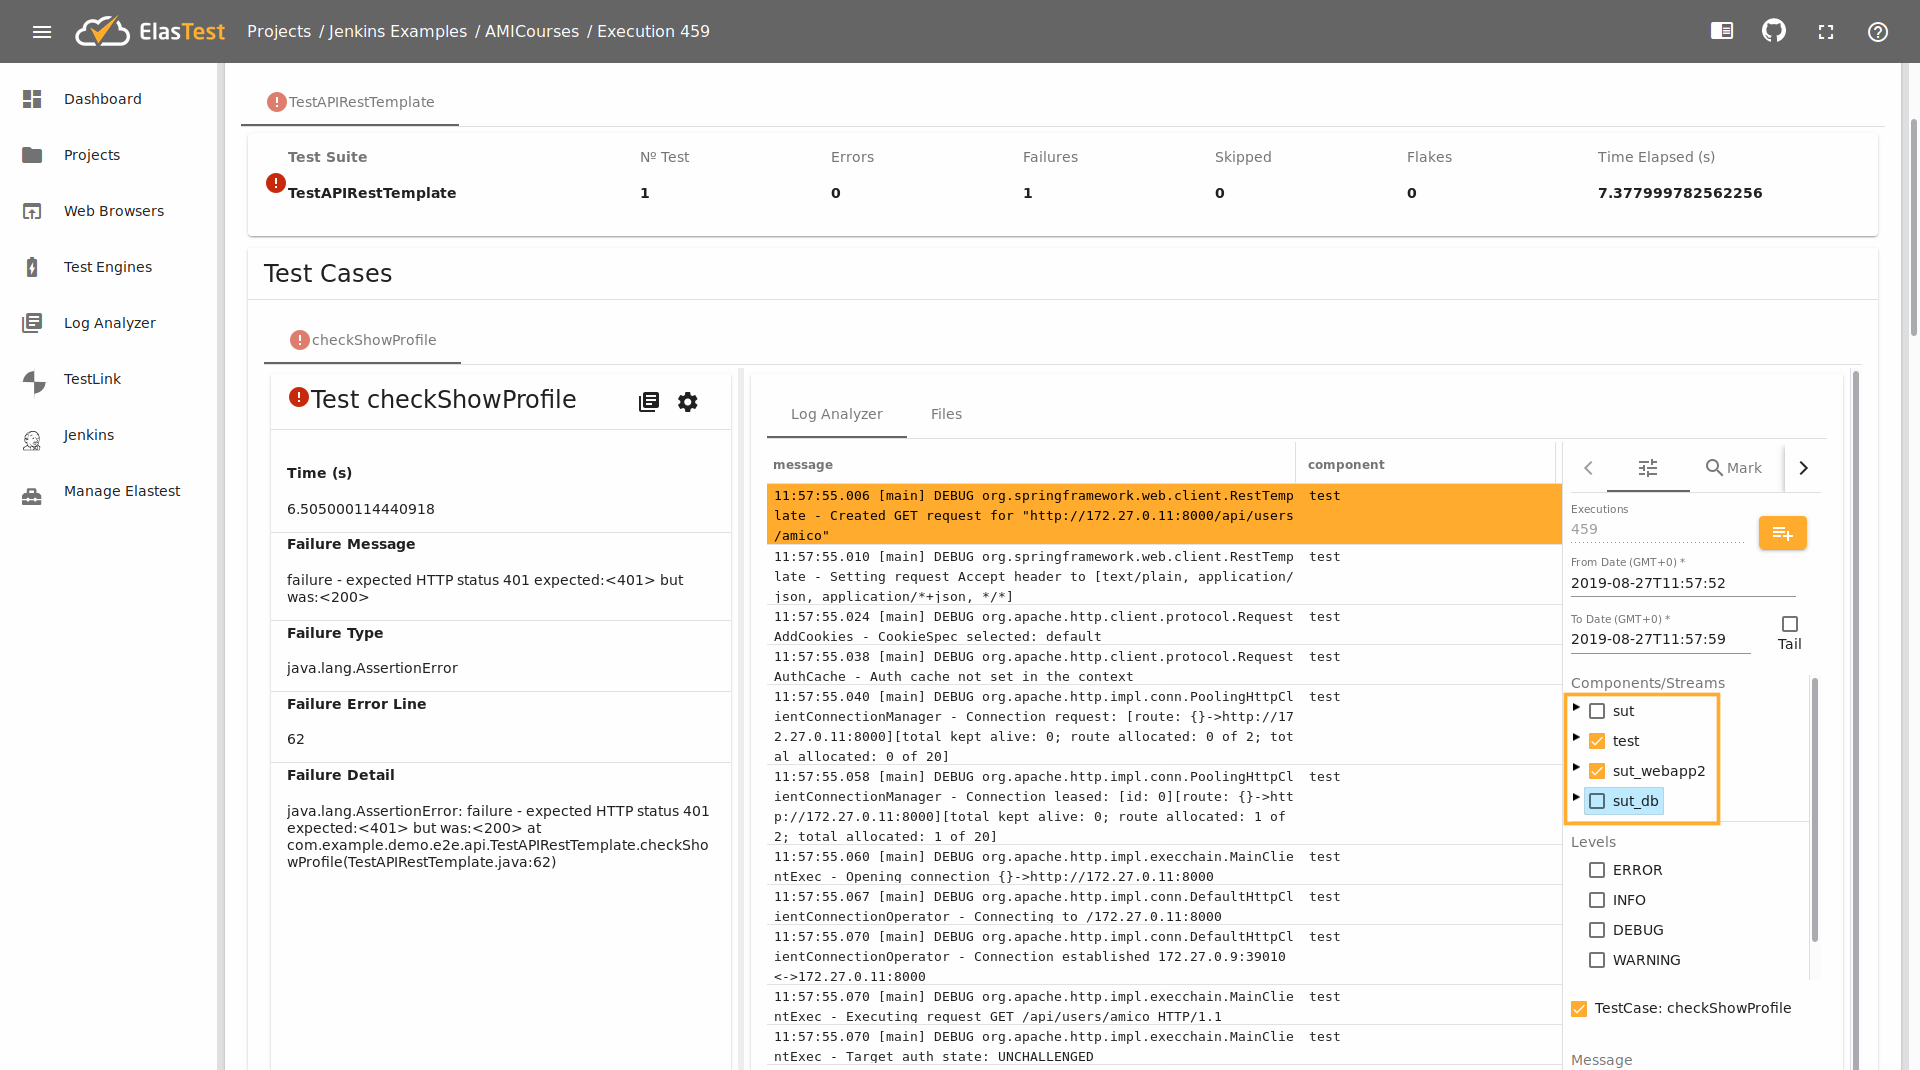
Observing sut & test behaviour in elastest
In the TJob we will observe the logs of the sut or test selecting the sut or test like we show in the following image:
Comparing executions (logs & metrics)
ElasTest allows compare two different executions, we will may the logs and metric comparative. We relaunch the Jenkins Job, but with a small changed. This changed makes the execution correct.
Change export AMICO_IMAGE=webapp-2-fixed-profile; for AMICO_IMAGE=webapp-2-master; in the Pipeline. The final result show in the folloging box:
node{
    def sutIp
    elastest(surefireReportsPattern: '**/target/surefire-reports/TEST-*.xml', monitoring: true, project: 'Jenkins Examples') {
        stage("Setting environment") {
            echo 'Environment variables'
            sh "env"
            git "https://github.com/elastest-experiments/webapp-2.git"
        }
        try {
            stage("Start Sut") {
                sh "cd docker-compose; export AMICO_IMAGE=webapp-2-master; docker-compose --no-ansi -p ${env.ET_SUT_CONTAINER_NAME} up -d"
                sutContainerName = env.ET_SUT_CONTAINER_NAME + "_webapp2_1";
                sutNetwork = getFirstNetwork(sutContainerName)
                sutIp = containerIp(sutContainerName,network)

                echo 'Sut ip: '+ sutIp
                sh 'docker run -e IP=' + sutIp + ' -e PORT=8000 --network=' + sutNetwork + ' elastest/etm-check-service-up'
            }
            stage("Run Tests") {
                withEnv(['ET_SUT_HOST=' + sutIp, 'ET_SUT_PORT=8000']) {
                    echo 'Running test'
                    mvnHome = tool 'M3.3.9'
                    sh "cd AMICOServer; '${mvnHome}/bin/mvn' -Dtest=TestAPIRestTemplate -B test"
                    step([$class: 'JUnitResultArchiver', testResults: '**/target/surefire-reports/TEST-*.xml'])
                }
            }
        } finally {
                echo 'Stopping SUT'
                sh "cd docker; docker-compose --no-ansi -p ${env.ET_SUT_CONTAINER_NAME} down"
        }
    }
}


def getFirstNetwork(containerName) {
    echo "Inside getFirstNetwork function"
    network = sh (
        script: "docker inspect " + containerName + " -f \"{{json .NetworkSettings.Networks}}\" | awk \"{sub(/:.*/,\\\"\\\")}1\" | awk \"{sub(/\\\"/,\\\"\\\")}1\" | awk \"{sub(/\\\"/,\\\"\\\")}1\" | awk \"{sub(/{/,\\\"\\\")}1\"",
        returnStdout: true
    ).trim()

    echo containerName+" Network = " + network;
    return network;
}

def containerIp(containerName, network) {
    echo "Inside containerIp function"
    containerIp = sh (
        script: "docker inspect --format=\"{{.NetworkSettings.Networks." + network + ".IPAddress}}\" "+ containerName,
        returnStdout: true
    ).trim()

    echo containerName+" IP = " + containerIp;
    return containerIp;
}
When we changed it, we will relaunch the job. And we will see:
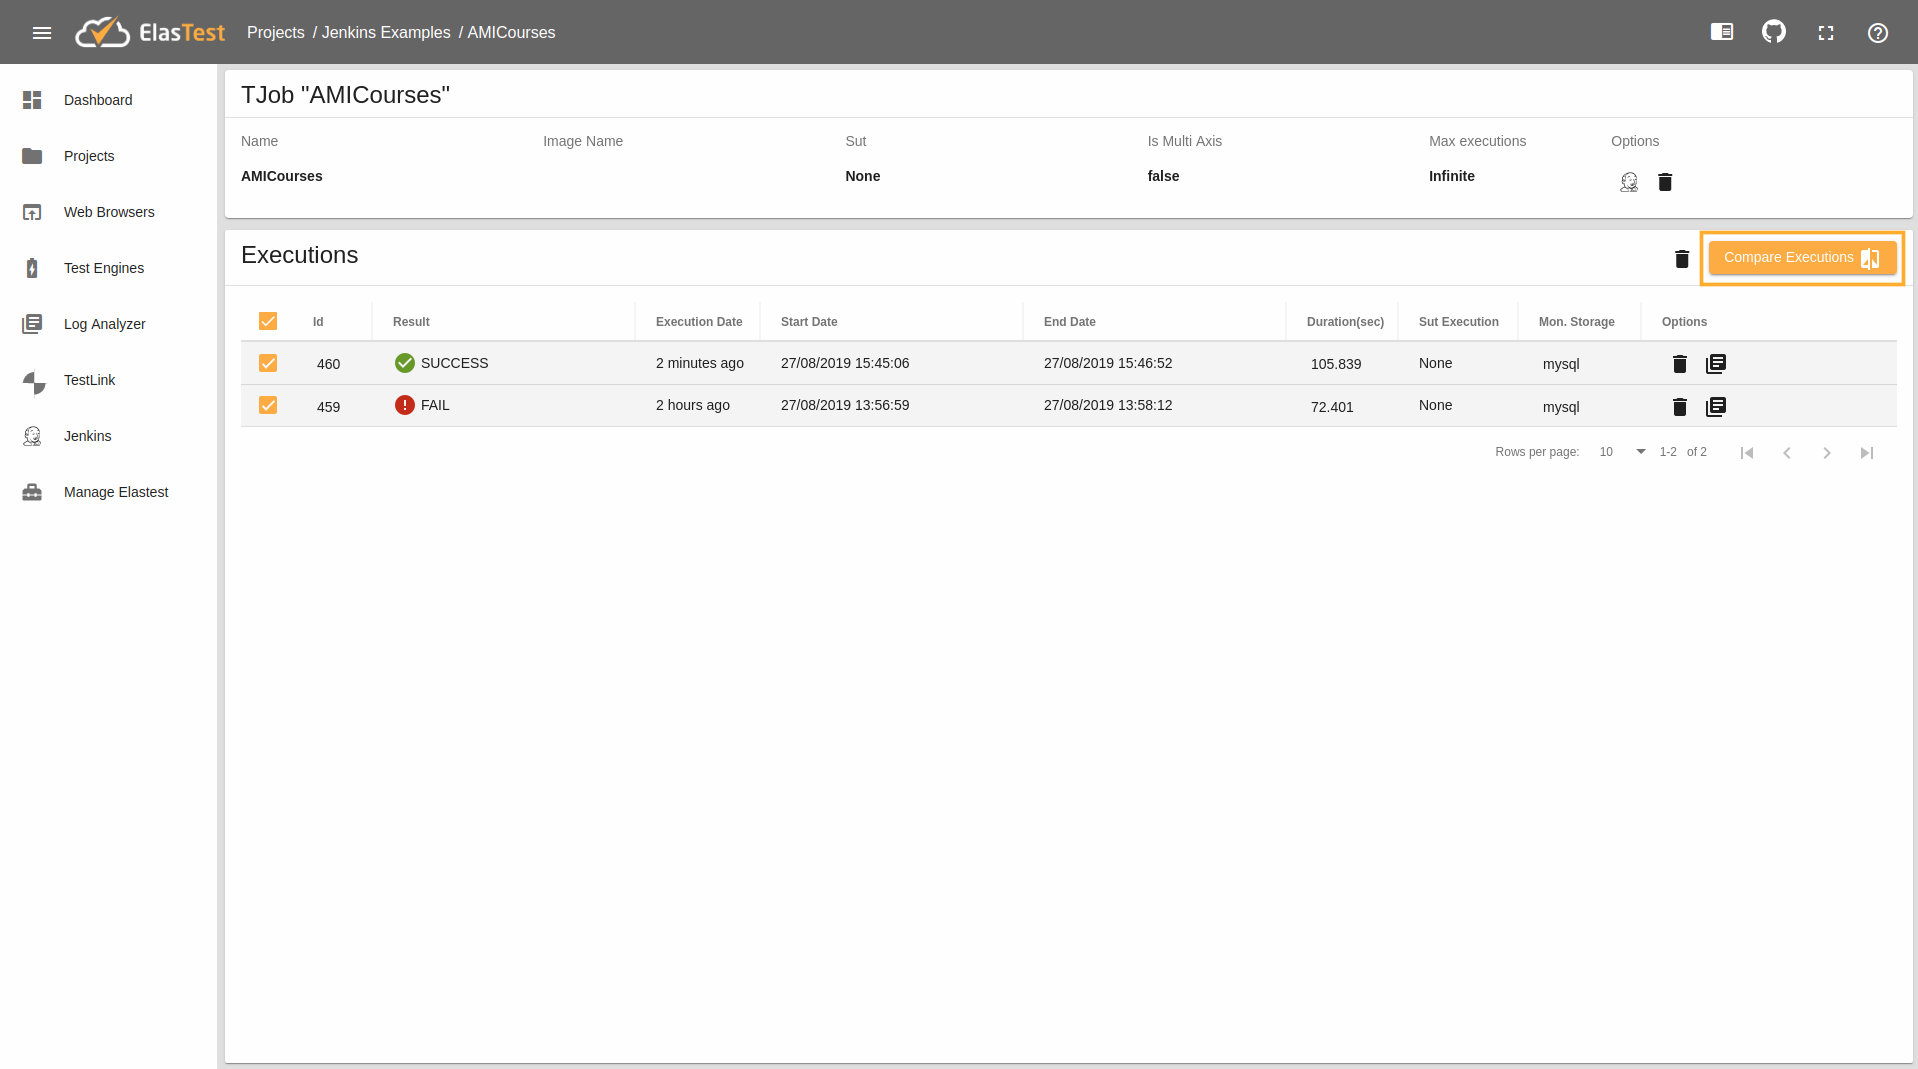
Now we will go to the AMICourses TJob in elastest and select the two executions from the table and finally press the Compare Executions button.
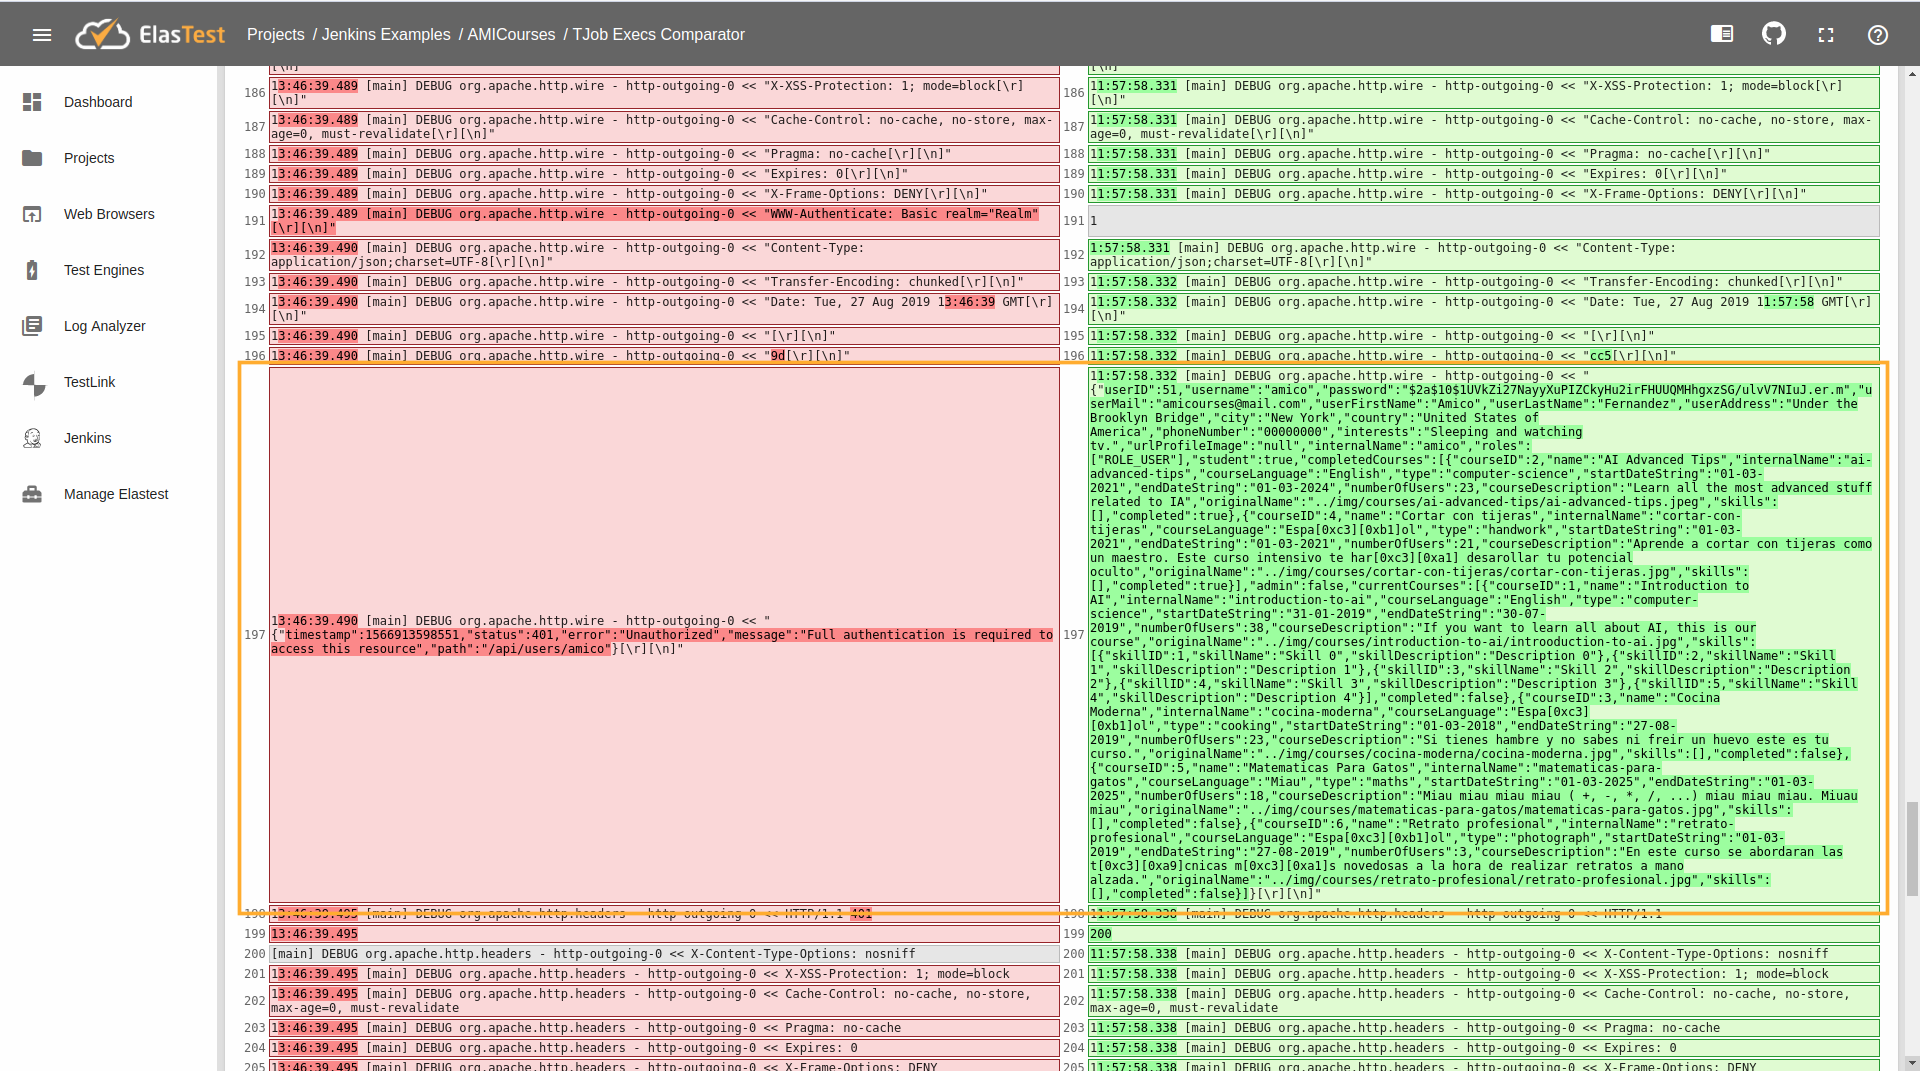
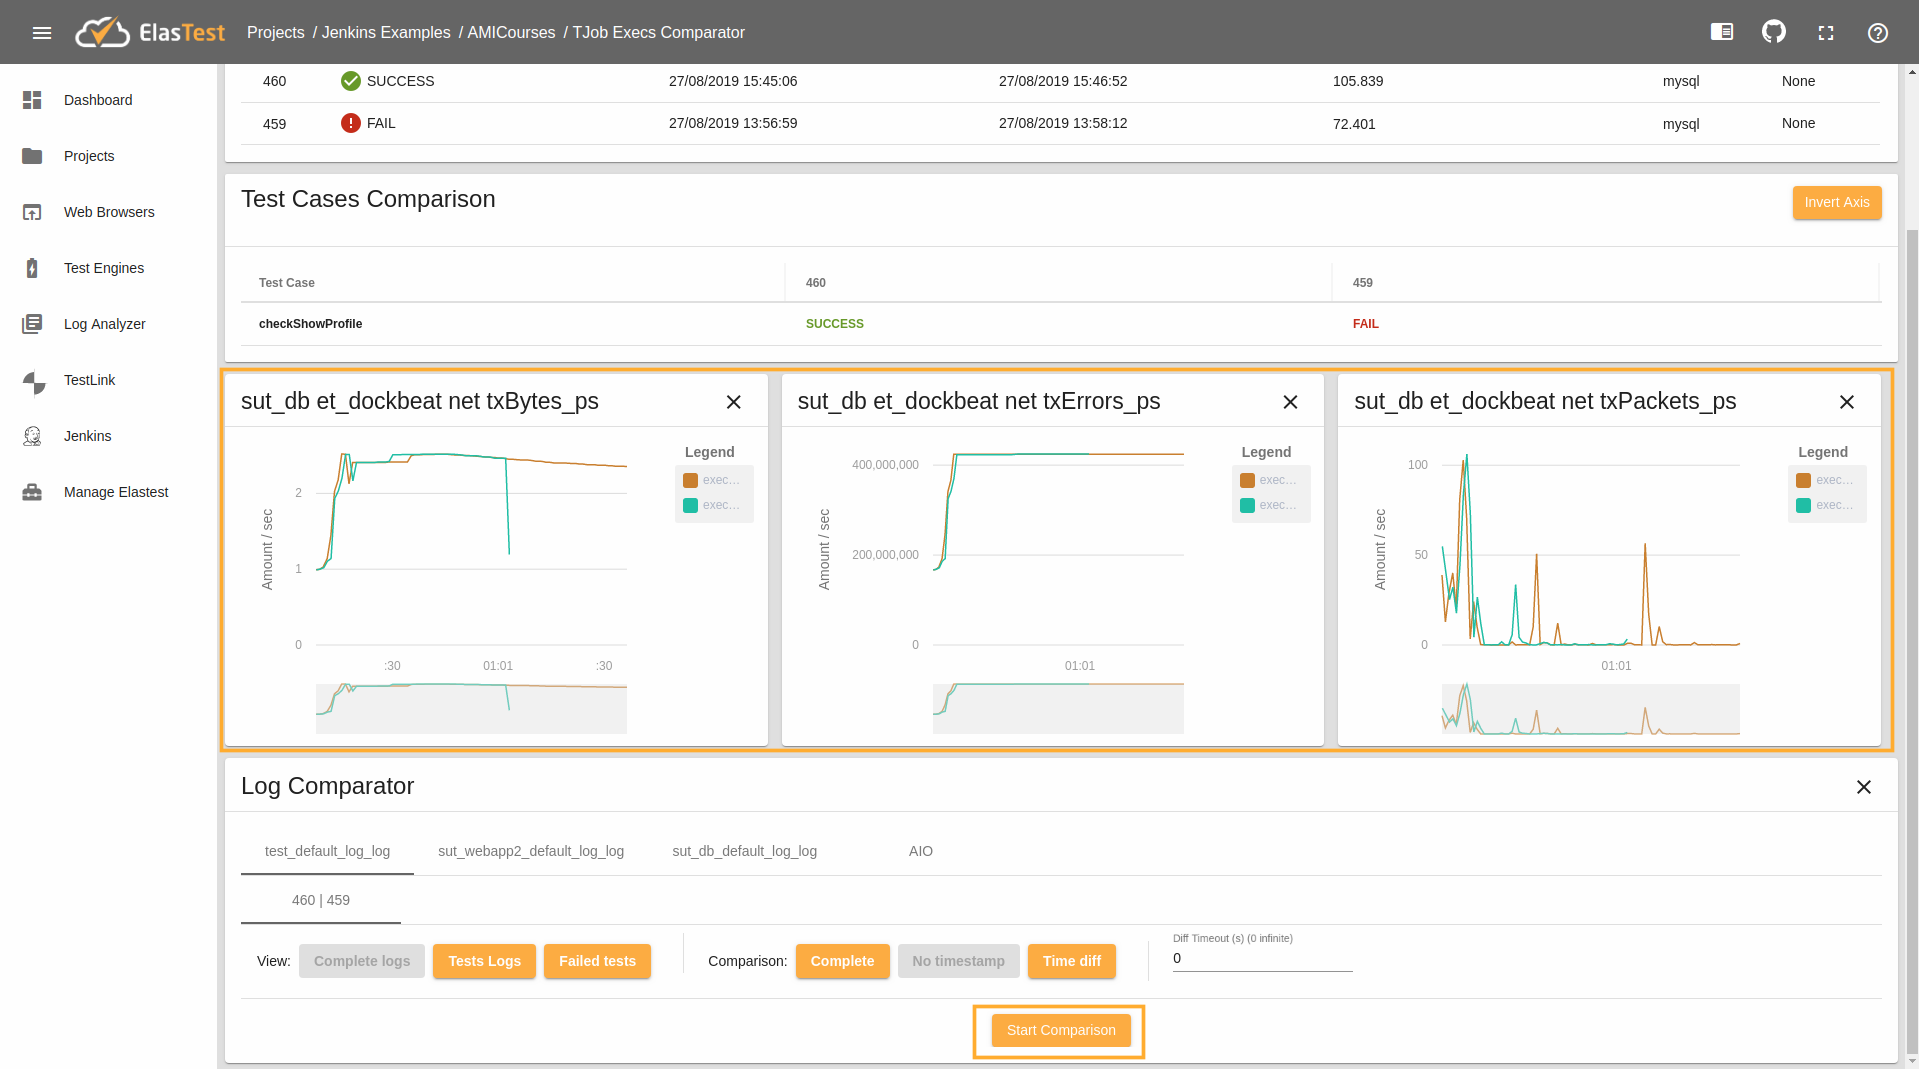
Once added you will see the following card, in this card we will see the metric comparisons and we will select the test_default_log and click the Start Comparison button for the show the comparison logs.
When push the button we will show the comparative betwen the two executions. In this case we will check that the left log return a 401 error nevertheless the right log return some information in JSON format. The test check that the not logged person no see the information that not correspond them. Therefore we check that the error is because the application return sensible information when not logged user.